
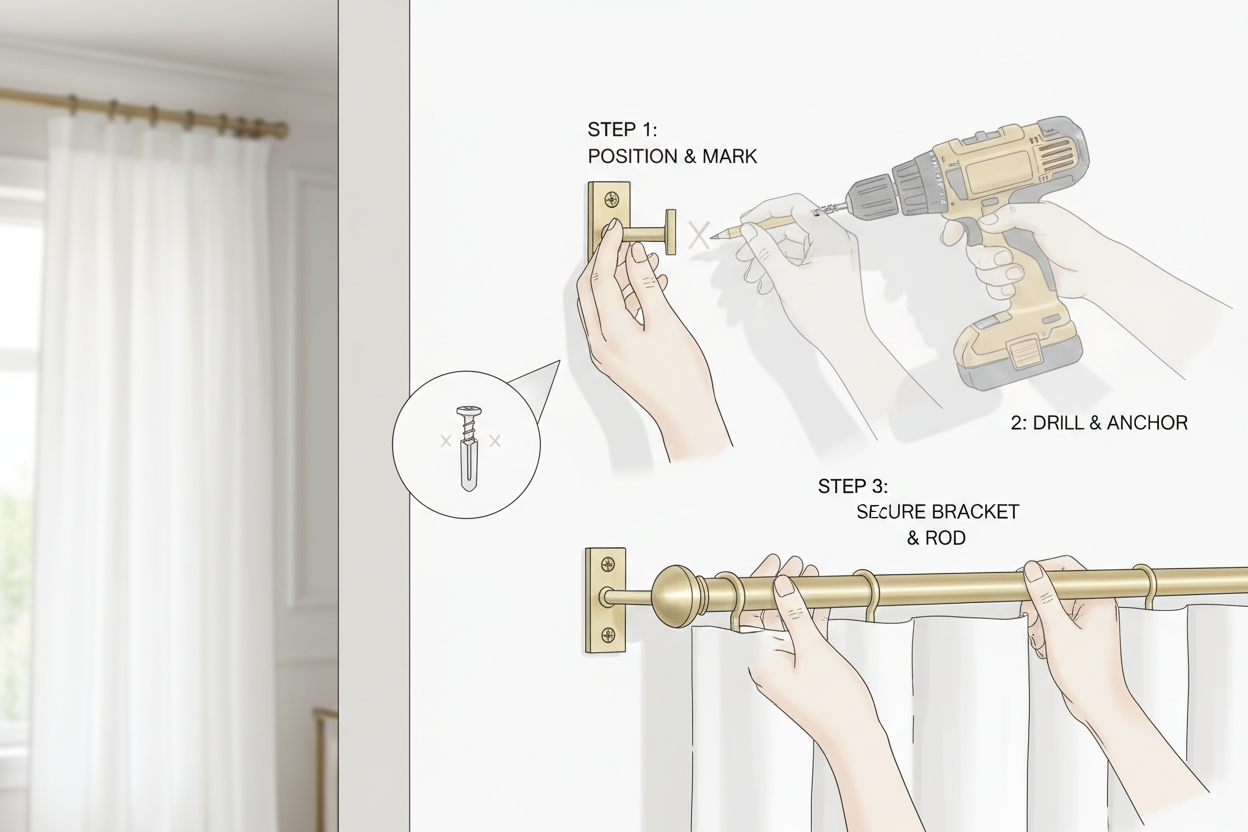
What You'll Need
- Curtain rod or track and brackets
- Drill and drill bits
- Wall plugs and screws (usually supplied with brackets)
- Spirit level
- Pencil
- Steel tape measure
- Stud finder (recommended for plasterboard walls)
Step 1: Plan Your Rod Position
Before drilling anything, decide exactly where your rod will sit.
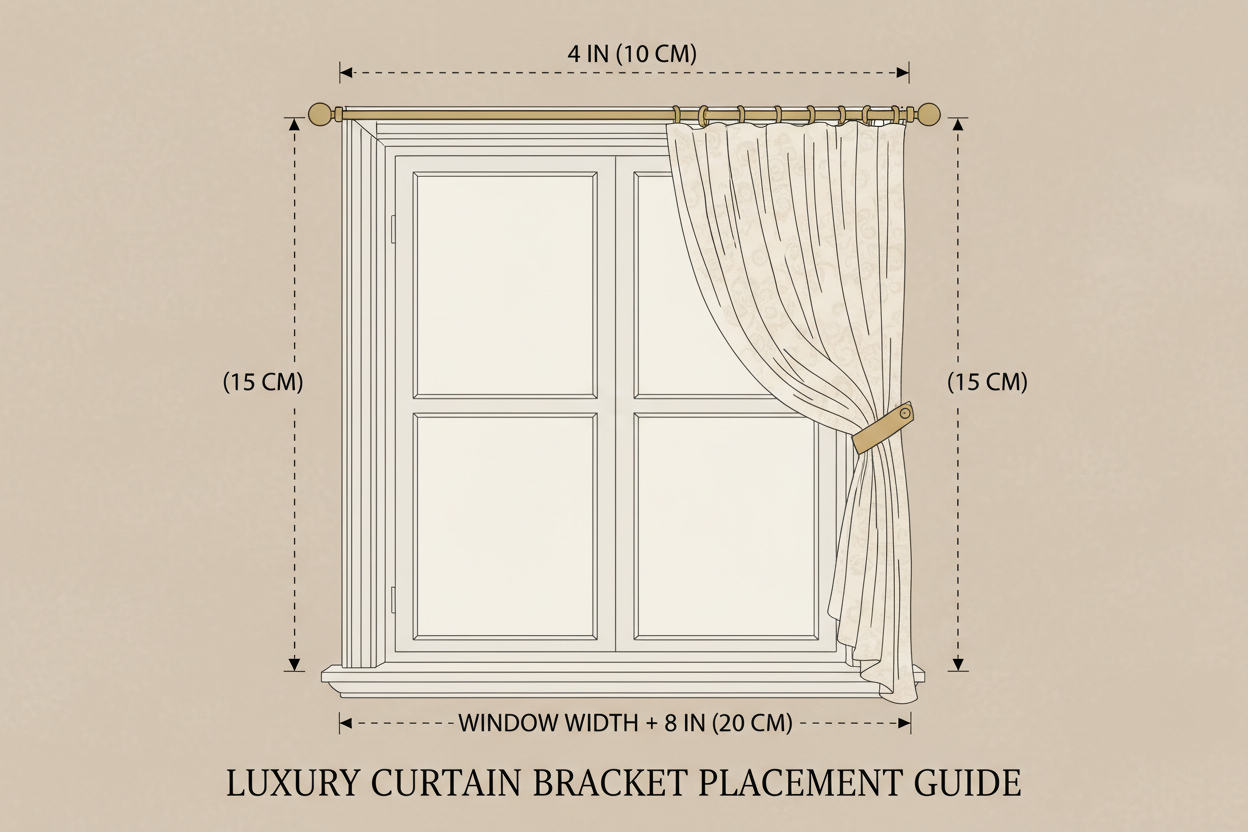
- Height: Mount the rod 10–15cm above the window frame for a classic look, or 5–10cm below the ceiling for a dramatic floor-to-ceiling effect.
- Width: Extend the rod 15–20cm beyond the window frame on each side so curtains clear the glass when open.
Mark the bracket positions lightly with a pencil. Use a spirit level to ensure both marks are at exactly the same height — even a few millimetres off will be visible once the curtains are hung.
Step 2: Check Your Wall Type
Knowing your wall type determines which fixings to use.
- Solid masonry (brick, concrete): Use masonry drill bits and wall plugs. These walls hold weight well.
- Plasterboard (drywall): Use a stud finder to locate timber studs behind the board. Fix into studs where possible for maximum strength. If studs aren't in the right position, use hollow wall anchors rated for the curtain weight.
- Timber frame: Standard wood screws into the frame work well.
Step 3: Drill and Fix the Brackets
- Hold the bracket against the wall at your pencil mark and mark the screw hole positions through the bracket.
- Drill pilot holes at each mark. For masonry, insert wall plugs.
- Screw the bracket firmly into place. Give it a firm tug to confirm it's secure before loading it with curtains.
- Repeat for the second bracket (and centre support bracket if needed).
Tip: For rods over 150cm wide, always fit a centre support bracket to prevent sagging.
Step 4: Assemble the Rod
If your rod comes in sections, join them according to the manufacturer's instructions. Thread any rings onto the rod before mounting it — it's much easier than trying to add them afterwards.
For eyelet curtains, thread the rod through the eyelets at this stage.
Step 5: Hang the Curtains
Place the rod into the brackets and secure the bracket caps or locking mechanisms. Then attach your curtains:
- Eyelet curtains: Already threaded onto the rod — just mount the rod.
- Tab top curtains: Loop the tabs over the rod before mounting.
- Pinch pleat / pencil pleat with hooks: Insert hooks into the header tape, then hang hooks onto the rings or track gliders.
- Rod pocket curtains: Thread the rod through the pocket before mounting.
Step 6: Adjust and Dress the Curtains
Once hung, spend a few minutes dressing the curtains — this makes a significant difference to the final look.
- Arrange the pleats or folds evenly across the full width.
- For pinch pleat curtains, gently push each pleat into shape and tie the curtains loosely with a strip of fabric or soft tie for 24–48 hours. This trains the folds to hang consistently.
- Check the drop is even across the full width. Adjust hooks or rings if needed.
Common Installation Mistakes
- Brackets too close to the window frame: The curtain stack back will cover the glass when open. Always extend the rod generously.
- No spirit level: Even a small tilt is very noticeable. Always check level before drilling.
- Undersized fixings: Heavy curtains need heavy-duty brackets and appropriate wall fixings. Don't use lightweight fixings for velvet or interlined panels.
- Skipping the centre bracket: Wide rods without centre support will bow over time, especially with heavy curtains.
Ceiling-Mounted Installation
For ceiling-mounted tracks, the process is similar but you'll be drilling into the ceiling rather than the wall. Always locate joists before drilling into a ceiling — use a stud finder or knock to find solid timber. Fix into joists wherever possible for a secure installation.
Need Help?
If you're unsure about any part of the installation — particularly for heavy curtains, unusual wall types, or ceiling mounting — we recommend consulting a professional installer. A well-hung curtain is worth the investment in getting it right.

Leave a comment
This site is protected by hCaptcha and the hCaptcha Privacy Policy and Terms of Service apply.